分析软件
ProMoSCOPE®单细胞糖基化检测数据分析
一、简介
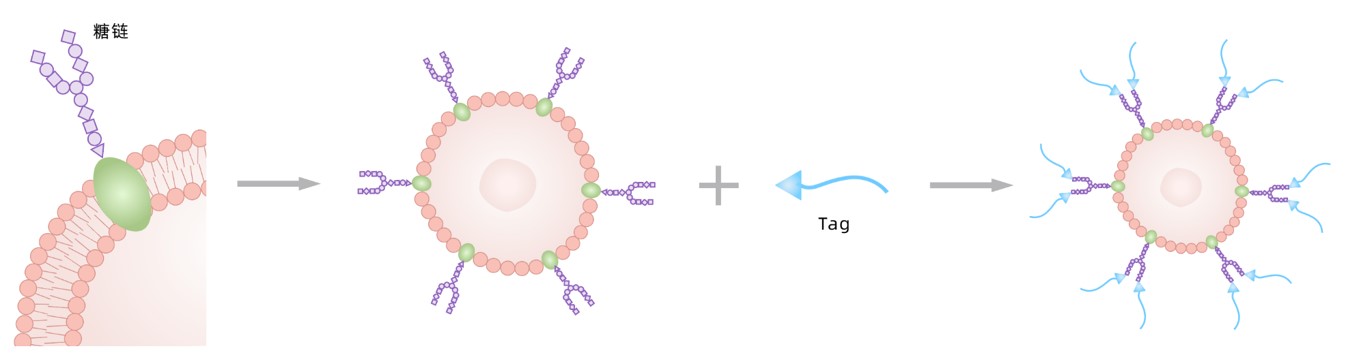
细胞膜糖基化在细胞识别中发挥重要作用,有研究者将其比喻为细胞的“面具”、“面膜”或“糖衣”。作为一种常见的蛋白翻译后修饰,糖基化在真核细胞中广泛存在,不同细胞类型的糖基化在类型和数量上也有较强的异质性。糖基化的基本过程是在糖基转移酶作用下将糖类转移至蛋白质,与蛋白质上特殊的氨基酸残基形成糖苷键。新格元开发了高通量单细胞糖基化检测试剂盒,可以在单细胞分辨率下同时检测单细胞转录组和细胞表面糖基化。基于酶促糖基化原理,在测序前经过糖基转移酶连接Tag,使用Singleron Barcode Beads可完成对单细胞Tag标签及转录组的捕获,通过标签文库及转录组的联合分析,可同时获得单样本的细胞转录组信息及细胞糖基化信息。
二、实验流程
- 利用ProMoSCOP®连接样本细胞,使其携带特异的Tag barcode信息,再利用GEXSCOPE®微流控芯片捕获单细胞。
- 细胞裂解后,GEXSCOPE®分子标签磁珠通过捕获成熟mRNA末端的poly-A,使细胞内mRNA和Tag barcode被加上相同的Cell Barcode。
- 逆转录成cDNA之后,分别进行Tag标签文库及单细胞转录组文库的构建,上机测序。
- 得到下机数据,用开源软件CeleScope进行分析,定量后得到样本的糖基化水平及单细胞转录组信息。

三、产品优势与应用领域
1.产品优势
- 组分全面:试剂盒包含转录组试剂组分及糖基化标记及建库组分,无需购买额外的试剂。
- 单细胞多组学:可同时获得单细胞转录组核糖组学。
- 高覆盖率:可定量多种糖基化信息
2.应用领域
- 肿瘤异质性研究:轻松建立单细胞糖基化图谱,辅助细胞亚型细分,探究细胞糖基化异质性。
- 免疫应答研究:免疫微环境糖基化研究,探索抗原识别与递呈糖基化关系,研究细胞状态特异的糖基化丰度。
- 发育研究:研究发育轨迹中的糖基化趋势,遗传失常糖基化研究。
- 药物研发与标志物检测:疾病标志物糖基化探究,糖免疫药物开发。
四、CeleScope sweetseq 分析流程
sweetseq pipeline(ProMoSCOPE®单细胞糖基化)包含6个主要指令,可以通过celescope sweetseq -h查看:
$ celescope sweetseq -h
usage: celescope sweetseq [-h] {sample,barcode,cutadapt,mapping_tag,count_tag,analysis_tag} ...

Single-cell sweetseq

positional arguments:
  {sample,barcode,cutadapt,mapping_tag,count_tag,analysis_tag}

optional arguments:
  -h, --help            show this help message and exit
$ celescope -v
1.14.1
下载测试数据与脚本
这些数据都是我们托管在GitHub上的测试数据,部分数据是人为生成的,仅供测试。
git clone https://github.com/singleron-RD/celescope_test_data.git
git clone https://github.com/singleron-RD/celescope_test_script.git
我们看一下测试数据与脚本的结构
# 测试数据
$ tree
.
├── fake_match_dir
│   ├── 05.count
│   │   └── fake_filtered_feature_bc_matrix
│   │       └── barcodes.tsv
│   └── 06.analysis
│       ├── fake_markers.tsv
│       └── fake_tsne_coord.tsv
├── fastqs
│   ├── test1_1.fq.gz
│   └── test1_2.fq.gz
├── sweet_tag_barcode.fasta
└── sweet_tag_linker.fasta

# 脚本
$ tree
.
├── run_shell.sh
└── sweetseq.mapfile
五、CeleScope sweetseq 分析流程实操
单细胞糖基化检测在实验过程中会构建一个单细胞转录组文库和一个糖基化标签文库,因此数据分析也分为两个部分:
- 单细胞转录组分析
- 单细胞糖基化检测分析
本篇文章内只介绍单细胞糖基化检测分析流程,而CeleScope分析单细胞转录组数据的教程已在前期中介绍过。
接下来,整个分析流程需要使用到分析流程中最重要的两个配置文件,sweetseq.mapfile和run_shell.sh
1.multi_sweetseq构建CeleScope sweetseq 分析shell脚本
配置mapfile文件:--mapfile是multi_sweetseq下的参数,需要提供一个制表符分隔 (tab-delimited) 的文本文件。mapfile 的每一行代表双端(paired-end)fastq文件。
$ cat sweetseq.mapfile
test1 ../../celescope_test_data/sweetseq/fastqs test1 ../../celescope_test_data/sweetseq/fake_match_dir/
- 第一列:test1:对应sweetseq_fastq文件的名称前缀
- 第二列:对应sweetseq_fastq文件的路径(绝对路径、相对路径都可以)
- 第三列:test1:对应质控报告的名称
- 第四列:对应与其“配对的”单细胞转录组分析fake_match_dir路径
配置shell脚本文件:run_shell.sh
$ cat run_shell.sh
multi_sweetseq \
 --mapfile ./sweetseq.mapfile \
 --linker_fasta ../../celescope_test_data/sweetseq/sweet_tag_linker.fasta \
 --barcode_fasta ../../celescope_test_data/sweetseq/sweet_tag_barcode.fasta \
 --fq_pattern L23C15 \
 --mod shell\
- --mapfile:对应上面编辑的sweetseq.mapfile的路径
- --linker_fasta:检查R2中的linker序列与linker_fasta文件中的linker序列之间是否匹配
- --barcode_fasta:检查R2中barcode与barcode_fasta文件中储存的barcode序列是否匹配
- --fq_pattern:R2序列模式,字母后面的数字代表碱基的数目。CLindex 是 L25C15,sweetseq 是 L23C15
- --mode:生成脚本类型,分为sjm及shell,默认为sjm
2.生成shell脚本
- 运行刚编辑好的shell脚本 run_shell.sh。
sh run_shell.sh
- 获得shell目录
$ tree -L
.
├── run_shell.sh
├── shell
│   └── test1.sh
└── sweetseq.mapfile
shell目录里存在一个脚本叫做 test1.sh,脚本中的每行指令都对应一步分析,也会在结果目录中生成一个目录。
$ cat test1.sh
celescope sweetseq sample --outdir .//test1/00.sample --sample test1 --thread 4 --chemistry auto  --fq1 ../../celescope_test_data/sweetseq/fastqs/test1_1.fq.gz
celescope sweetseq barcode --outdir .//test1/01.barcode --sample test1 --thread 4 --chemistry auto --lowNum 2  --fq1 ../../celescope_test_data/sweetseq/fastqs/test1_1.fq.gz --fq2 ../../celescope_test_data/sweetseq/fastqs/test1_2.fq.gz
celescope sweetseq cutadapt --outdir .//test1/02.cutadapt --sample test1 --thread 4 --minimum_length 20 --nextseq_trim 20 --overlap 10 --insert 150  --fq .//test1/01.barcode/test1_2.fq
celescope sweetseq mapping_tag --outdir .//test1/03.mapping_tag --sample test1 --thread 4 --fq_pattern L23C15 --barcode_fasta ../../celescope_test_data/sweetseq/sweet_tag_barcode.fasta --linker_fasta ../../celescope_test_data/sweetseq/sweet_tag_linker.fasta  --fq .//test1/02.cutadapt/test1_clean_2.fq
celescope sweetseq count_tag --outdir .//test1/04.count_tag --sample test1 --thread 4  --match_dir ../../celescope_test_data/sweetseq/fake_match_dir/ --read_count_file .//test1/03.mapping_tag/test1_read_count.tsv
celescope sweetseq analysis_tag --outdir .//test1/05.analysis_tag --sample test1 --thread 4  --match_dir ../../celescope_test_data/sweetseq/fake_match_dir/ --tsne_tag_file .//test1/04.count_tag/test1_tsne_tag.tsv
3.投递shell脚本
进入shell目录后,可以运行脚本 test1.sh,即在命令行中输入 sh run_shell.sh。程序就会在当前界面运行,但这种投递方式存在一些弊端:终端界面不能关闭,不能断网离线,否则运行的程序就会中断。为了避免这种经情况的发生,我们可以使用nohup命令将运行脚本投递到后台运行,使用 nohup test1.sh &命令,同时生成 test1 目录与 nohup.out 运行日志文件。
$ tree -L 1
.
├── nohup.out
├── test1
└── test1.sh
4.结果目录
$ tree
.
├── 00.sample
│   └── stat.txt
├── 01.barcode
│   ├── stat.txt
│   └── test1_2.fq
├── 02.cutadapt
│   ├── cutadapt.log
│   ├── stat.txt
│   └── test1_clean_2.fq
├── 03.mapping_tag
│   ├── stat.txt
│   ├── test1_invalid_barcode.tsv
│   └── test1_read_count.tsv
├── 04.count_tag
│   ├── stat.txt
│   ├── test1_tsne_tag.tsv
│   └── test1_umi_tag.tsv
├── 05.analysis_tag
│   └── stat.txt
└── test1_report.html
当我们运行完成后,会得到一个单细胞糖基化检测分析的网页报告:test1_report.html。
网页报告中包括以下信息:
- 质控报告的样本和软件的基本信息
- 数据质控信息
- 样本标签比对信息比对信息
- 细胞按标签拆分后的统计信息
本文仅做软件安装测试使用,更多软件更新信息参见:https://github.com/singleron-RD/CeleScope